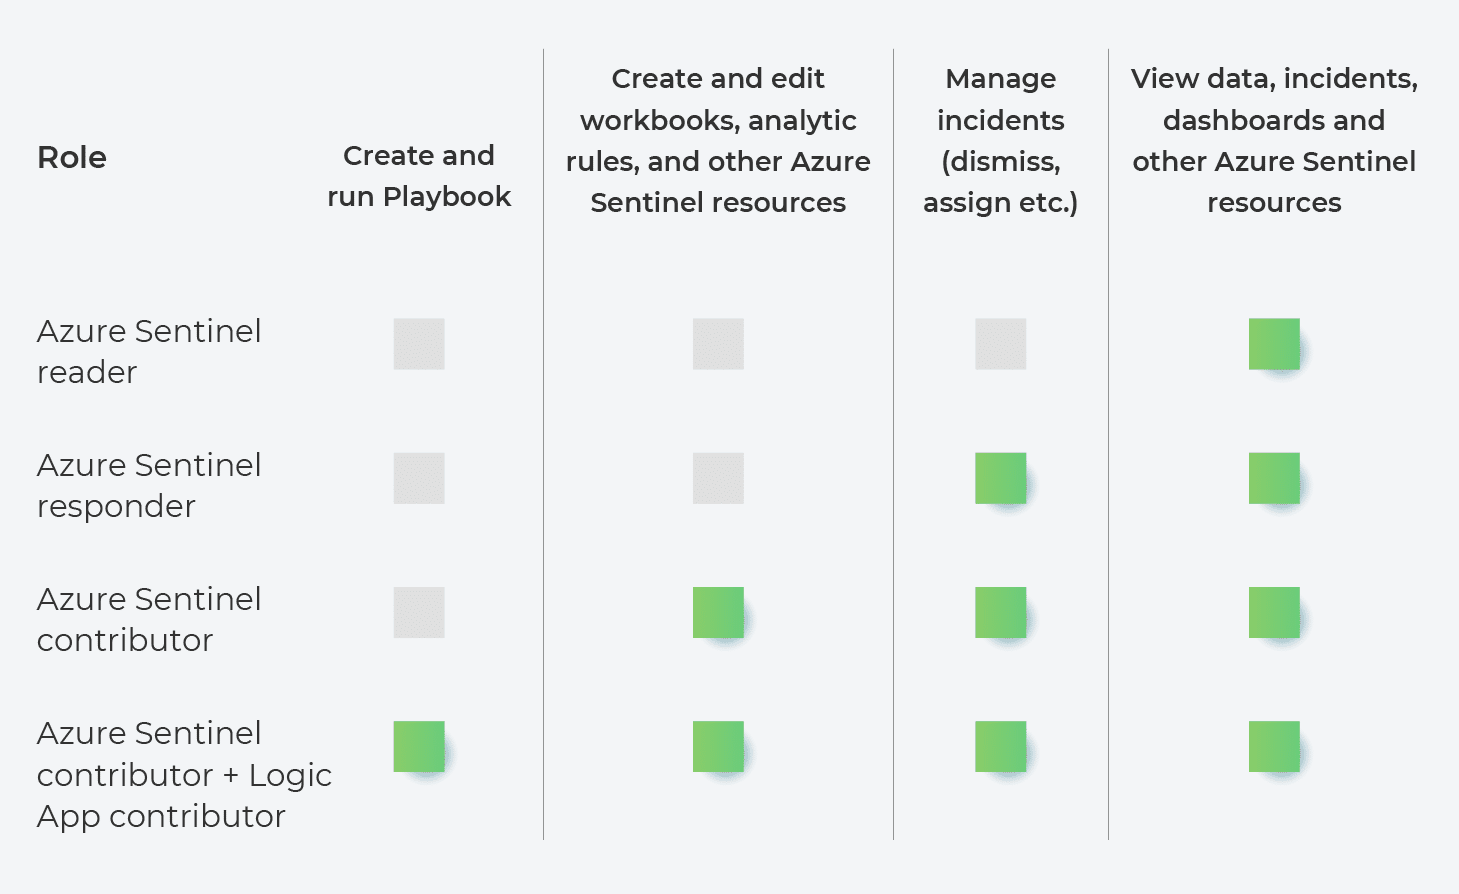
This is part 1 of a 2-part series.
For those of you who aren’t familiar with it, Microsoft Azure Sentinel is a scalable, cloud-native, security information event management (SIEM) solution. It collects data from all of your cloud or on-premises assets and delivers machine learning-driven security analytics for visibility of threats, while leveraging threat intelligence and artificial intelligence for threat hunting across the enterprise.
In this 1st part of our 2-part series, you will learn how to plan a successful deployment of Azure Sentinel so it can be managed in a multi-tenancy environment with Azure Lighthouse.
What is Azure Lighthouse?
Azure Lighthouse enables cross- and multi-tenant management, allowing for greater automation, scalability, and enhanced governance across resources and tenants.
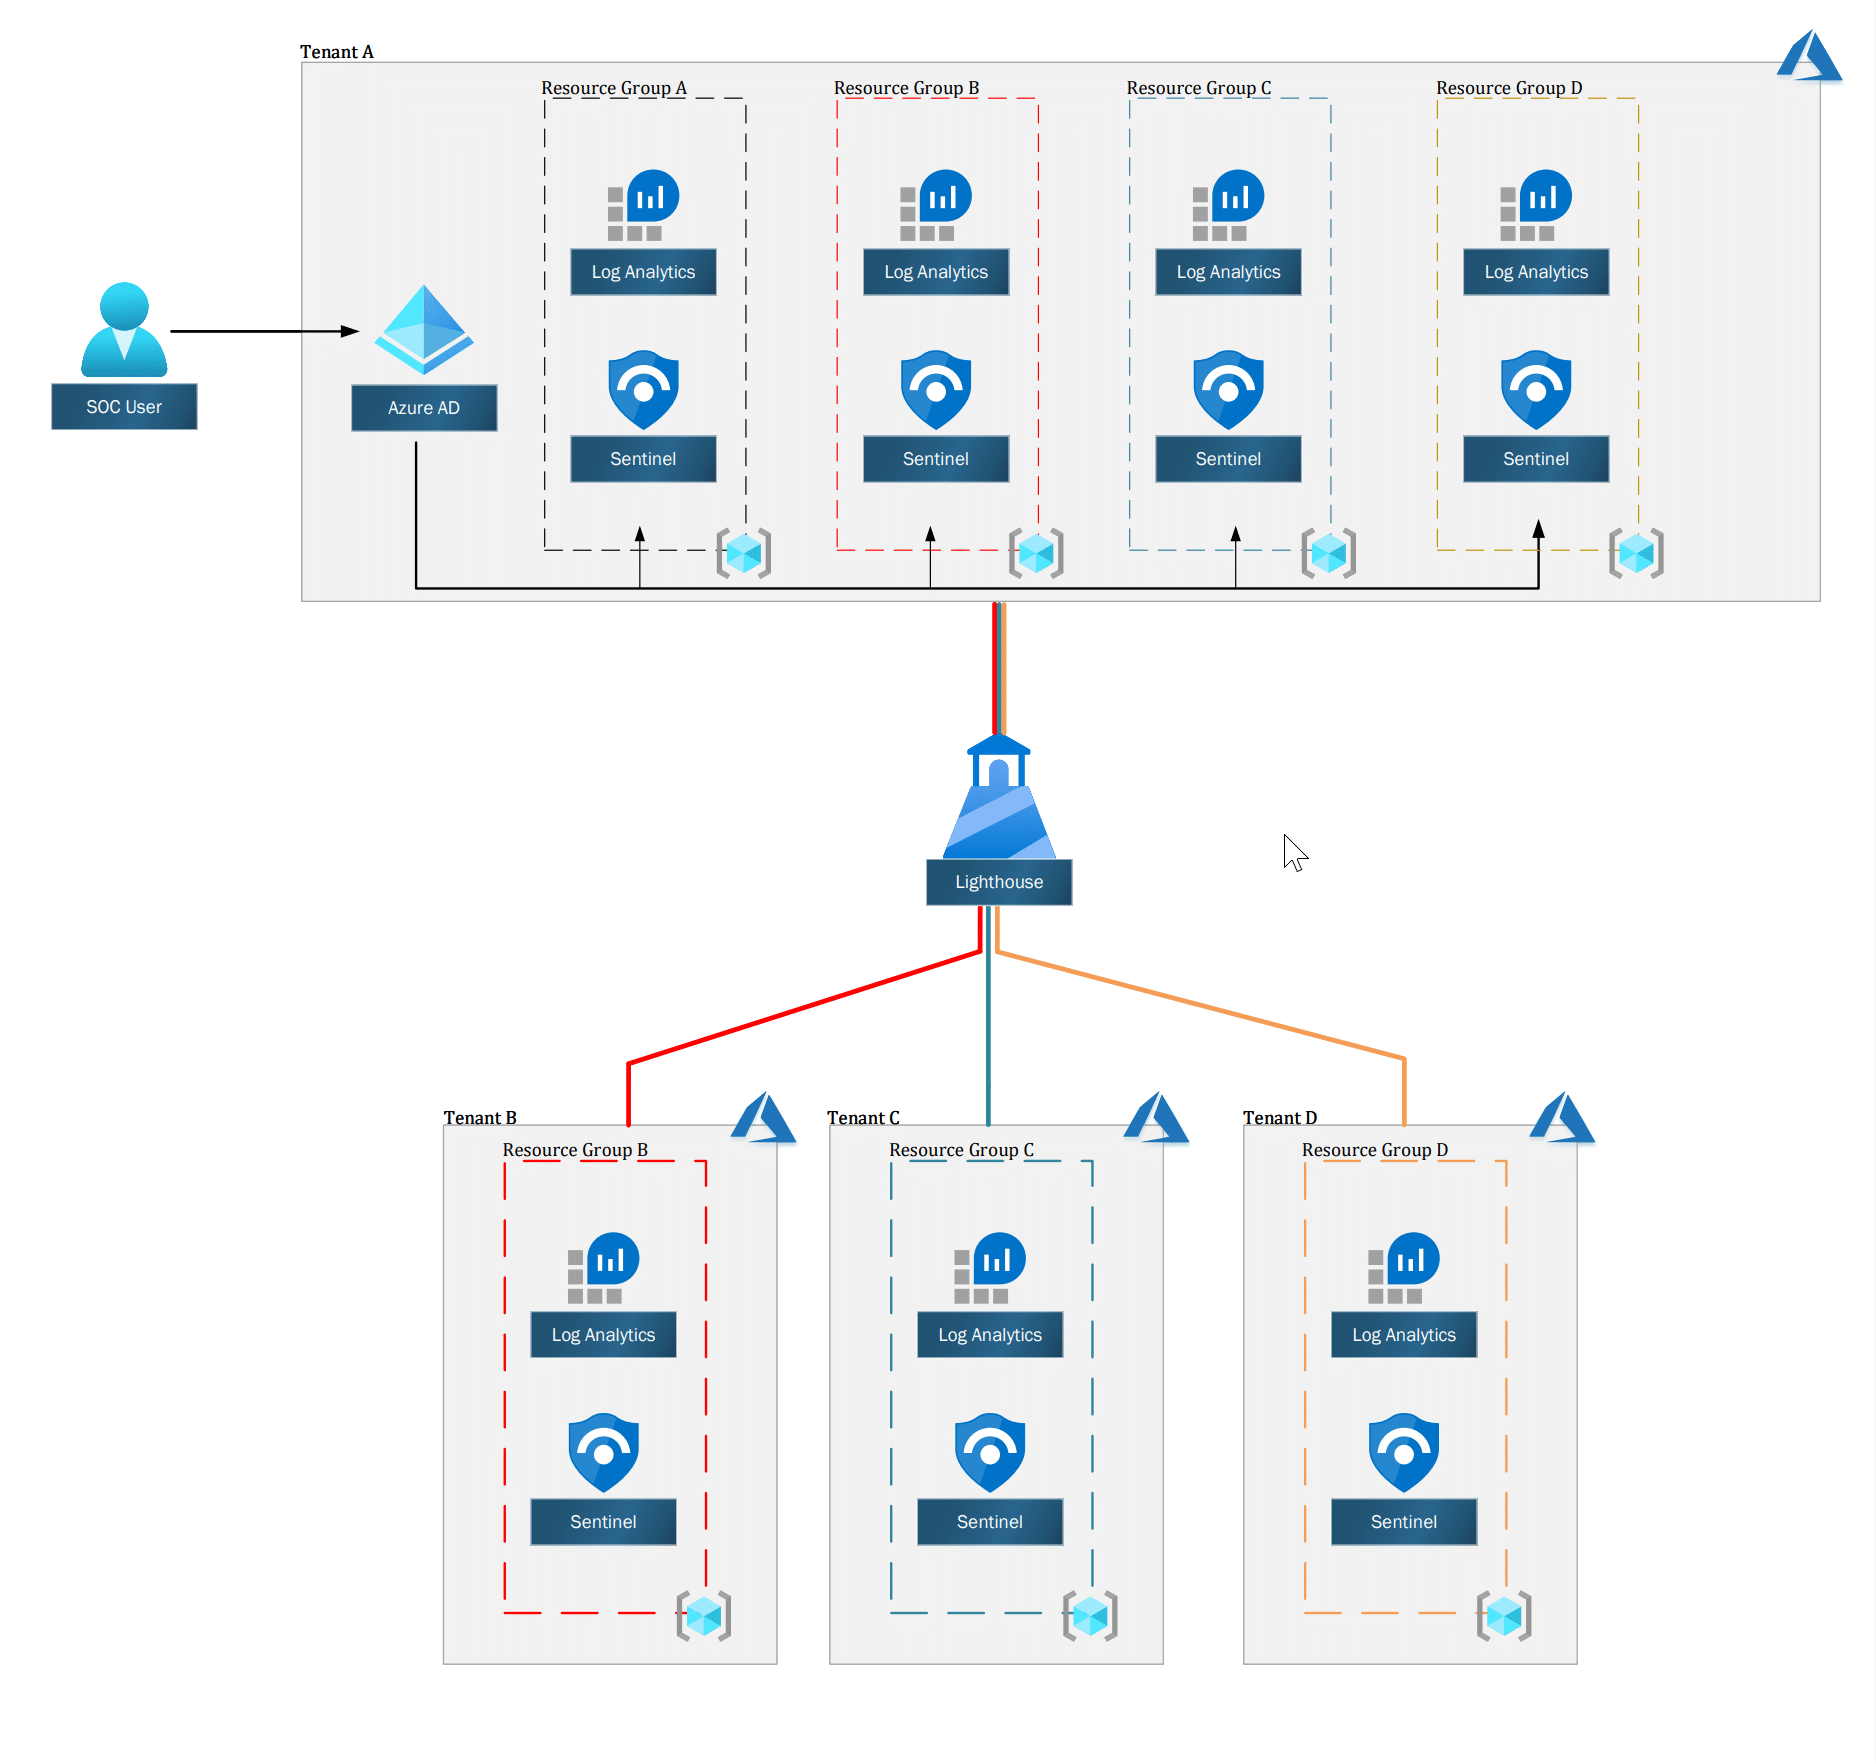
With Azure Lighthouse, you can expose resource groups or subscriptions with the resources inside (see Figure 1). For example, this could mean exposing Azure Sentinel and Log Analytics workspaces from all of your tenants to your central management dashboard.
Azure Lighthouse is secure by design, as it delegates permissions to users and/or groups from the central tenant to resources in other tenants.
There are no additional costs associated with using Azure Lighthouse to manage Azure resources – and any Azure customer or partner is allowed to use it.
Azure Lighthouse is secure by design, as it delegates permissions to users and/or groups from the central tenant to resources in other tenants. This means you can use the same account and see only the resources that have been exposed to you.
Figure 1: High-level diagram of Azure Sentinel with Azure Lighthouse
Prerequisites to Deploying Azure Lighthouse
Before starting a deployment of Azure Sentinel with Azure Lighthouse, a few prerequisites must be met.
First, the deployment must be done using a non-guest account in your tenant. The account must have the built-in role of Owner for the subscription being onboarded (or it must contain the resource groups that are being onboarded).
In addition, you will need:
- The tenant ID of the service provider’s tenant (where you will be managing the customer’s resources)
- The tenant ID of the customer’s tenant (which will have resources managed by the service provider)
- The subscription IDs for each specific subscription in the customer’s tenant that will be managed by the service provider – or that contains the resource group(s) that will be managed by the service provider
After meeting these prerequisites, we can start the deployment.
Planning the Deployment of Azure Lighthouse
Permissions
When deploying Lighthouse, permissions are delegated to our users. Planning carefully before starting the deployment will save time later.

Role Definitions
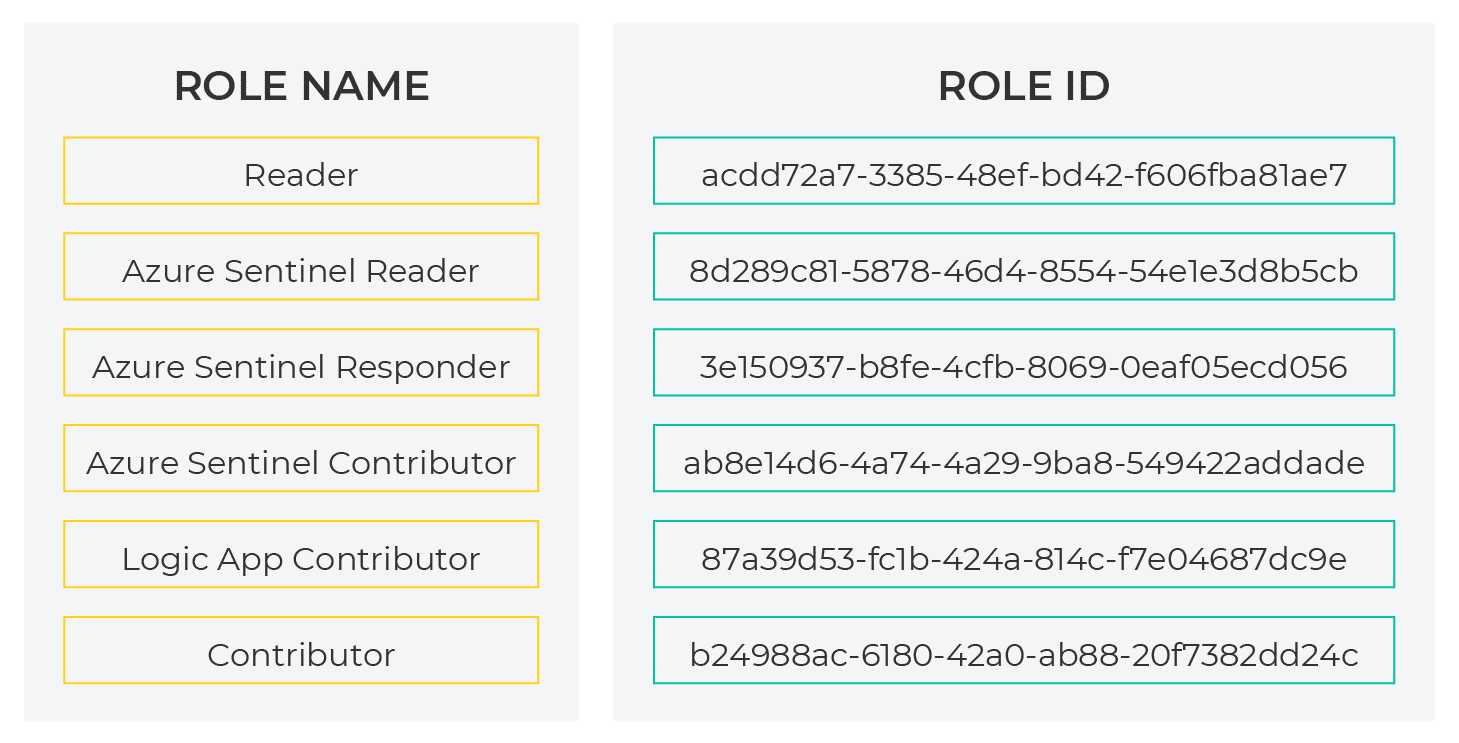
To define authorizations, you need to know the ID values for each user, user group, or service principal in the service provider tenant to which you want to grant access. You also need the role definition ID for each built-in role you want to assign. If you don’t have these already, you can retrieve them by running the commands below from within PowerShell:
Get-AzRoleDefinition | select Name, ID
To make it easy, here are the IDs that are necessary:
You will use these IDs later in this guide.
Security Groups
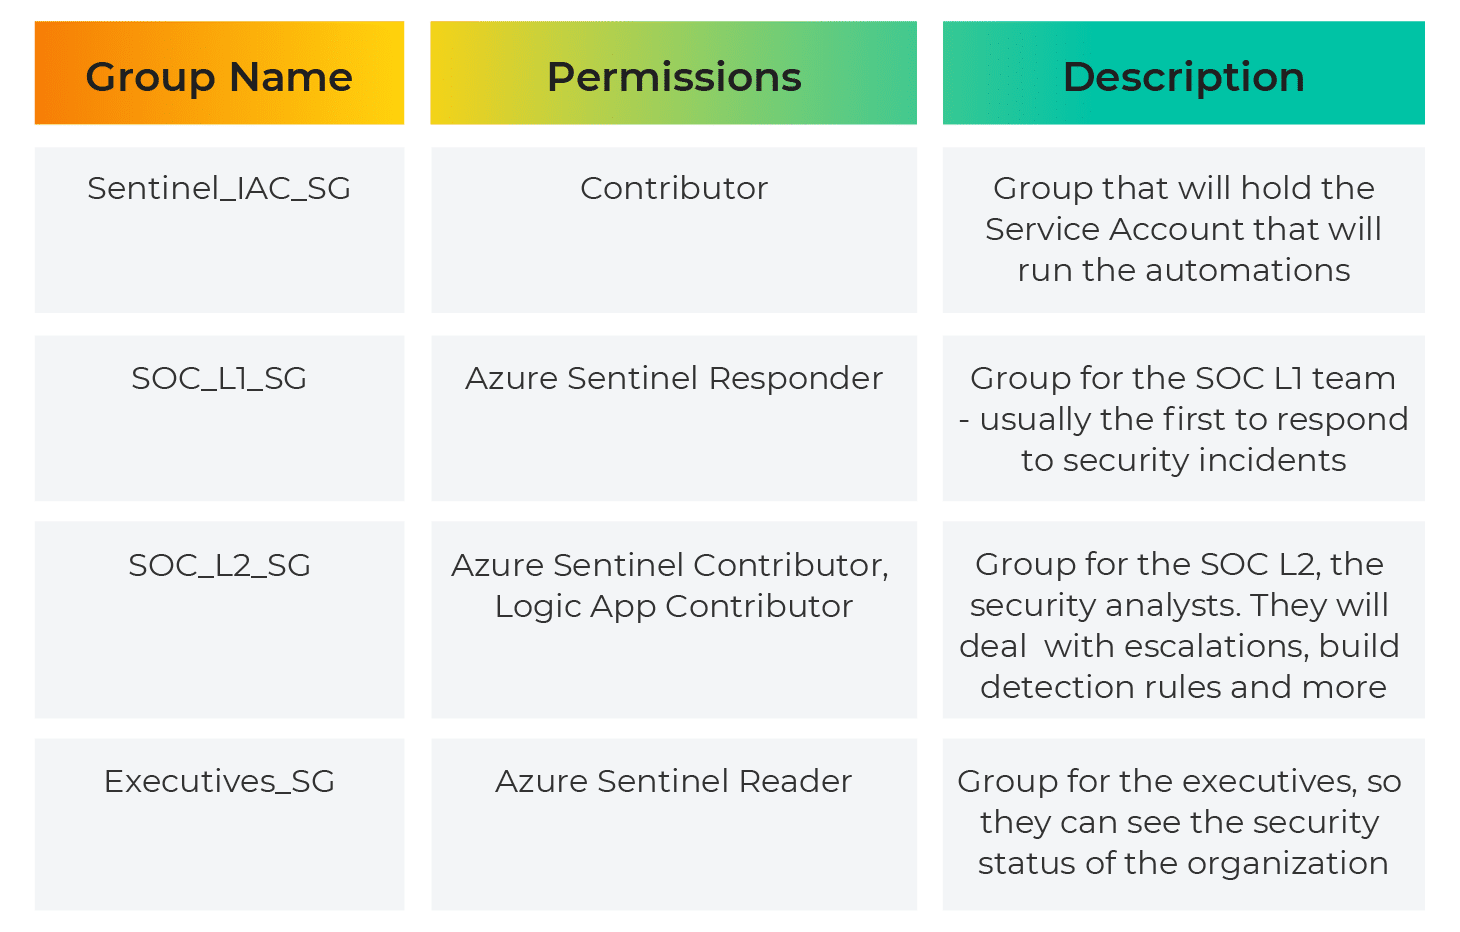
To make management easier, use Azure AD security groups for each role. This gives you the flexibility to add or remove individual users to the group that has access – so that you don’t have to repeat the onboarding process to make user changes. You can assign roles to a service principal, which can be useful in automation scenarios.
The following groups are used in this post:
Optional – Deploy using PowerShell
If you want to deploy the templates using PowerShell, you will first need to set up a session to Azure using PowerShell. Here’s how:
Install the Az Module
Azure PowerShell Az module is a PowerShell module for interacting with Azure. Az offers shorter commands, improved stability, and cross-platform support.
To install it, run the following command:
Install-Module az -AllowClobber -Scope CurrentUser
Connect to Azure with PowerShell
hunting.Obtain your Tenant ID and Subscription ID from the Azure Portal.
With this information, you can use the Connect-AzAccount to create a session with Azure:
$TenantID = ‘XXXXXXXX-XXXX-XXXX-XXXX-XXXXXXXXXXXX’
$SubscriptionID = ‘XXXXXXXX-XXXX-XXXX-XXXX-XXXXXXXXXXXX’
Connect-AzAccount -TenantId $TenantID -SubscriptionId $SubscriptionID
Now you can interact with Azure from PowerShell.
CONCLUSION
In this post, we described Azure Lighthouse and the benefits of using it along with Azure Sentinel and explored how to plan for a deployment of a multi-tenancy Azure Sentinel environment so it can be managed with Azure Lighthouse.
In the second part of this series, we will explore deployment of Azure Sentinel using PowerShell.


